If you look at avalanche advisories other English-speaking countries like Canada and New Zealand, they will look similar to our advisory. Most elements of this look actually started in Utah and spread to many other parts of the world and evolved in the process. Now, it's our turn to match the look that other countries have gravitated towards. In the summer of 2012, many of the U.S. avalanche centers in our region met to negotiate a common look including Wyoming, Idaho California and Colorado. Eventually, you should see these areas adopt the same look and menu structrure.
First, realize that the avalanche advisory is designed for people who have taken at least an avalanche awareness class or preferably an avalanche Level 1 course. So we don't expect a first time user to understand the contents of an advisory. This is a tutorial to explain the basic concepts of the advisory and how to read it.
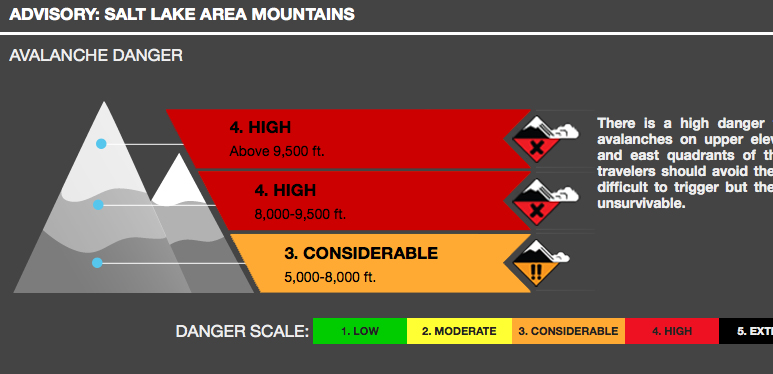
The Mountain Graphic
For those who just want a general overview of the avalanche danger, we provide the mountain graphic with just a short paragraph on the "Bottom Line" information. This section many tell you whether you can safely walk you dog on a mountain trail or snowmobile on a mountain road. The rest of the advisory gives more specific avalanche information you will need for more specific trip planning decisions. For a tutorial on danger ratings clickHERE.

Avalanche Problems
There are many different kinds of avalanches and each has its own characteristics--how to recognize, how to manage and how long they will last. Most Level 1 avalanche classes cover these various avalanche problems. For a quick tutorial, clickHERE.
For each problem, we tell you both graphically and in text, where you will find the problem by aspect and elevation, the characteristics of the problem such as how easy it is to trigger, size, distribution the expected future trend and how to manage.
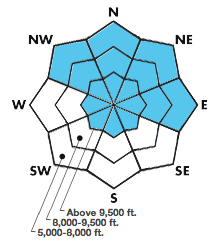
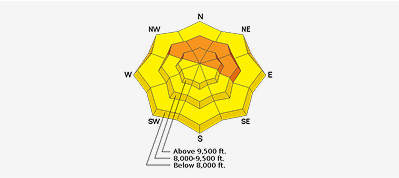
The Aspect-Elevation Rose
The aspect-elevation rose is a powerful way to understand the general avalanche pattern in a glance by aspect (the direction a slope faces) and elevation.
Imagine looking straight down on a mountain from above where the center of the diagram is the top of the mountain and the outside edges of the diagram are the lowest elevation terrain. The shape of the diagram is supposed to remind you that mountains have many ridges, gullies and bowls. For instance, even on the south side of a mountain, the sides of gullies or ridges may face east or west and there may be parts of a south-facing bowl that actually face north. Aspect is aspect no matter where you find it.
These blue-and-white roses are what we call "locator roses" meaning that they show you the general aspect and elevation where you will MOST LIKELY find the avalanche problem, not all the places where you might find it.

Advanced View
If you click the Advanced View tab at the top of the advisory, you can see the version of the advisory for the more advanced user. Notice that the roses are now colored in with the avalanche danger by aspect and elevation. There is a danger rose not only for each avalanche problem, but there is an overall danger rose at the top of the advisory that shows the highest danger rating for that aspect and elevation from all the avalanche problems. For instance, if there is a High danger for persistent slabs for north facing slopes at the highest elevation and a Considerable danger for wind slabs in the same area, the overall danger rose will be colored for the highest level--High in this case. Remember, these roses are meant only to provide a GENERAL pattern mostly for trip planning purposes and they are not meant for specific terrain and route finding choices. So, for instance, don't be tempted to plot these on a GIS map and march up to the edge of the orange coloring. You will need to make all your slope-specific decisions based on the usual skills and procedures learned in a field-based avalanche class.
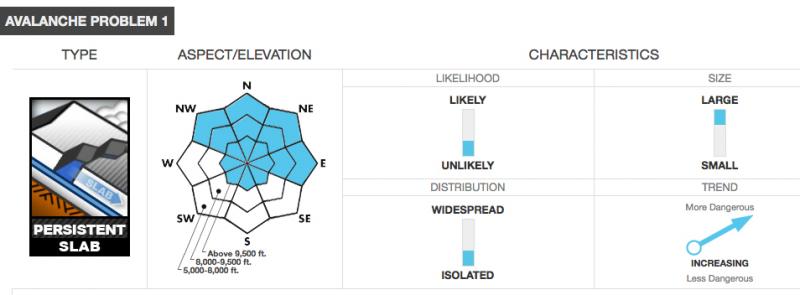
Likelihood of Triggeringmeans the probability that a single person will trigger that type of avalanche in the terrain specified. The bottom position means it's unlikely to trigger an avalanche, the middle position means that it is possible and the top position means it's likely. Sizemeans the size of the avalanche. The bottom position means generally small avalanches that are fairly "manageable". The middle position means medium-sized avalanches that could easily bury a person. The top position means large, probably un-survivable avalanches. Distributionmeans how widespread is the problem. The bottom position means isolated, the middle position means localized to certain terrain features and the top position means widespread areas. Trendmeans the expected future trend of the avalanche danger, getting safer, staying the same or getting more dangerous.
Finally, remember this information is only for AVALANCHE TERRAIN, which is generally slopes steeper than 30 degrees (or flatter slopes locally connected to steeper terrain). Even on high danger days you can find much safer terrain if you stay on slopes less steep than about 30 degrees that are not underneath steeper terrain.